Cloud-native developer. Distributed systems wannabe. DevOps and continuous delivery. 10x troublemaker.
15050 stories
·
4 followers

Parsers all the way down: writing a self-hosting parser

1 Share

One of the things we’re working on in my new programming language is a self-hosting compiler. Having a self-hosted compiler is a critical step in the development of (some) programming languages: it signals that the language is mature enough to be comfortably used to implement itself. While this isn’t right for some languages (e.g. shell scripts), for a systems programming language like ours, this is a crucial step in our bootstrapping plan. Our self-hosted parser design was completed this week, and today I’ll share some details about how it works and how it came to be.

This is the third parser which has been implemented for this language. We wrote a sacrificial compiler prototype upfront to help inform the language design, and that first compiler used yacc for its parser. Using yacc was helpful at first because it makes it reasonably simple to iterate on the parser when the language is still undergoing frequent and far-reaching design changes. Another nice side-effect starting with a yacc parser is that it makes it quite easy to produce a formal grammar when you settle on the design. Here’s a peek at some of our original parser code:

struct_type
	: T_STRUCT '{' struct_fields '}' {
		$$.flags = 0;
		$$.storage = TYPE_STRUCT;
		allocfrom((void **)&$$.fields, &$3, sizeof($3));
	}
	| T_UNION '{' struct_fields '}' {
		$$.flags = 0;
		$$.storage = TYPE_UNION;
		allocfrom((void **)&$$.fields, &$3, sizeof($3));
	}
	;

struct_fields
	: struct_field
	| struct_field ',' { $$ = $1; }
	| struct_field ',' struct_fields {
		$$ = $1;
		allocfrom((void **)&$$.next, &$3, sizeof($3));
	}
	;

struct_field
	: T_IDENT ':' type {
		$$.name = $1;
		allocfrom((void**)&$$.type, &$3, sizeof($3));
		$$.next = NULL;
	}
	;

This approach has you writing code which is already almost a formal grammar in its own right. If we strip out the C code, we get the following:

struct_type
	: T_STRUCT '{' struct_fields '}'
	| T_UNION '{' struct_fields '}'
	;

struct_fields
	: struct_field
	| struct_field ','
	| struct_field ',' struct_fields
	;

struct_field
	: T_IDENT ':' type
	;

This gives us a reasonably clean path to writing a formal grammar (and specification) for the language, which is what we did next.

A screenshot of a PDF file which shows a formal grammar similar to the samplegiven above.

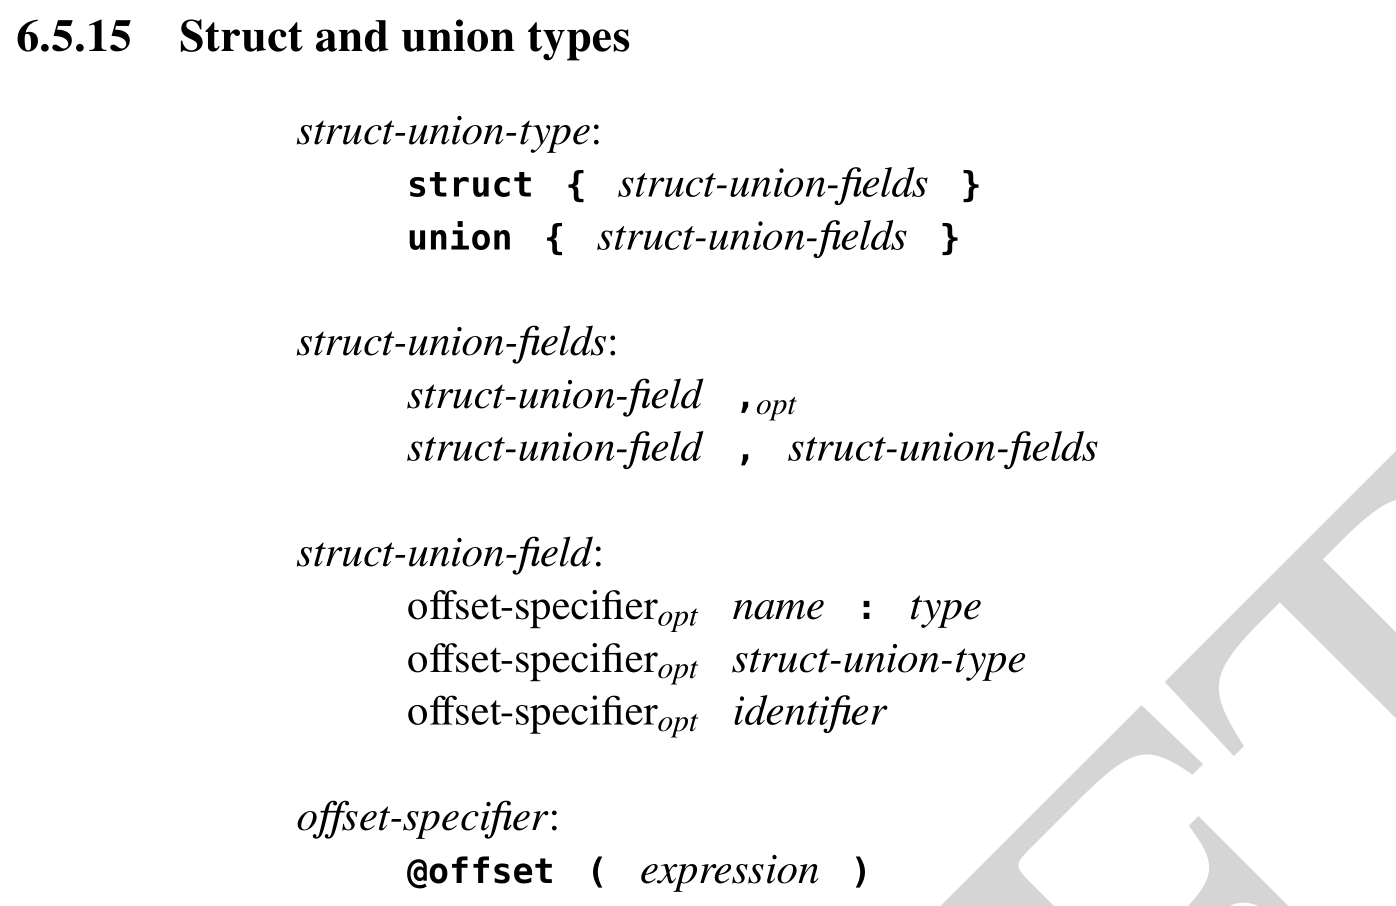
All of these samples describe a struct type. The following example shows what this grammar looks like in real code — starting from the word “struct” and including up to the “}” at the end.

type coordinates = struct {
    x: int,
    y: int,
    z: int,
};

In order to feed our parser tokens to work with, we also need a lexer, or a lexical analyzer. This turns a series of characters like “struct” into a single token, like the T_STRUCT we used in the yacc code. Like the original compiler used yacc as a parser generator, we also used lex as a lexer generator. It’s simply a list of regexes and the names of the tokens that match those regexes, plus a little bit of extra code to do things like turning “1234” into an int with a value of 1234. Our lexer also kept track of line and column numbers as it consumed characters from input files.

"struct"	{ _lineno(); return T_STRUCT; }
"union"		{ _lineno(); return T_UNION; }
"{"		{ _lineno(); return '{'; }
"}"		{ _lineno(); return '}'; }

[a-zA-Z][a-zA-Z0-9_]* {
	_lineno();
	yylval.sval = strdup(yytext);
	return T_IDENTIFIER;
}

After we settled on the design with our prototype compiler, which was able to compile some simple test programs to give us a feel for our language design, we set it aside and wrote the specification, and, alongside it, a second compiler. This new compiler was written in C — the language was not ready to self-host yet — and uses a hand-written recursive descent parser.

To simplify the parser, we deliberately designed a context-free LL(1) grammar, which means it (a) can parse an input unambiguously without needing additional context, and (b) only requires one token of look-ahead. This makes our parser design a lot simpler, which was a deliberate goal of the language design. Our hand-rolled lexer is slightly more complicated: it requires two characters of lookahead to distinguish between the “.”, “..”, and “…” tokens.

I’ll skip going in depth on the design of the second parser, because the hosted parser is more interesting, and a pretty similar design anyway. Let’s start by taking a look at our hosted lexer. Our lexer is initialized with an input source (e.g. a file) from which it can read a stream of characters. Then, each time we need a token, we’ll ask it to read the next one out. It will read as many characters as it needs to unambiguously identify the next token, then hand it up to the caller.

Our specification provides some information to guide the lexer design:

A token is the smallest unit of meaning in the **** grammar. The lexical analysis phase processes a UTF-8 source file to produce a stream of tokens by matching the terminals with the input text.

Tokens may be separated by white-space characters, which are defined as the Unicode code-points U+0009 (horizontal tabulation), U+000A (line feed), and U+0020 (space). Any number of whitespace characters may be inserted between tokens, either to disambiguate from subsequent tokens, or for aesthetic purposes. This whitespace is discarded during the lexical analysis phase.

Within a single token, white-space is meaningful. For example, the string-literal token is defined by two quotation marks " enclosing any number of literal characters. The enclosed characters are considered part of the string-literal token and any whitespace therein is not discarded.

The lexical analysis process consumes Unicode characters from the source file input until it is exhausted, performing the following steps in order: it shall consume and discard white-space characters until a non-white-space character is found, then consume the longest sequence of characters which could constitute a token, and emit it to the token stream.

There are a few different kinds of tokens our lexer is going to need to handle: operators, like “+” and “-"; keywords, like “struct” and “return”; user-defined identifiers, like variable names; and constants, like string and numeric literals.

In short, given the following source code:

fn add2(x: int, y: int) int = x + y;

We need to return the following sequence of tokens:

fn      (keyword)
add2    (identifier)
(       (operator)
x
:
int
,
y
int
)
int
=
x
+
y
;

This way, our parser doesn’t have to deal with whitespace, or distinguishing “int” (keyword) from “integer” (identifier), or handling invalid tokens like “$”. To actually implement this behavior, we’ll start with an initialization function which populates a state structure.

// Initializes a new lexer for the given input stream. The path is borrowed.
export fn init(in: *io::stream, path: str, flags: flags...) lexer = {
	return lexer {
		in = in,
		path = path,
		loc = (1, 1),
		un = void,
		rb = [void...],
	};
};

export type lexer = struct {
	in: *io::stream,
	path: str,
	loc: (uint, uint),
	rb: [2](rune | io::EOF | void),
};

This state structure holds, respectively:

  • The input I/O stream
  • The path to the current input file
  • The current (line, column) number
  • A buffer of un-read characters from the input, for lookahead

The main entry point for doing the actual lexing will look like this:

// Returns the next token from the lexer.
export fn lex(lex: *lexer) (token | error);

// A single lexical token, the value it represents, and its location in a file.
export type token = (ltok, value, location);

// A token value, used for tokens such as '1337' (an integer).
export type value = (str | rune | i64 | u64 | f64 | void);

// A location in a source file.
export type location = struct {
	path: str,
	line: uint,
	col: uint
};

// A lexical token class.
export type ltok = enum uint {
	UNDERSCORE,
	ABORT,
	ALLOC,
	APPEND,
	AS,
	// ... continued ...
	EOF,
};

The idea is that when the caller needs another token, they will call lex, and receive either a token or an error. The purpose of our lex function is to read out the next character and decide what kind of tokens it might be the start of, and dispatch to more specific lexing functions to handle each case.

export fn lex(lex: *lexer) (token | error) = {
	let loc = location { ... };
	let rn: rune = match (nextw(lex)?) {
		_: io::EOF => return (ltok::EOF, void, mkloc(lex)),
		rl: (rune, location) => {
			loc = rl.1;
			rl.0;
		},
	};

	if (is_name(rn, false)) {
		unget(lex, rn);
		return lex_name(lex, loc, true);
	};
	if (ascii::isdigit(rn)) {
		unget(lex, rn);
		return lex_literal(lex, loc);
	};

	let tok: ltok = switch (rn) {
		* => return syntaxerr(loc, "invalid character"),
		'"', '\'' => {
			unget(lex, rn);
			return lex_rn_str(lex, loc);
		},
		'.', '<', '>' => return lex3(lex, loc, rn),
		'^', '*', '%', '/', '+', '-', ':', '!', '&', '|', '=' => {
			return lex2(lex, loc, rn);
		},
		'~' => ltok::BNOT,
		',' => ltok::COMMA,
		'{' => ltok::LBRACE,
		'[' => ltok::LBRACKET,
		'(' => ltok::LPAREN,
		'}' => ltok::RBRACE,
		']' => ltok::RBRACKET,
		')' => ltok::RPAREN,
		';' => ltok::SEMICOLON,
		'?' => ltok::QUESTION,
	};
	return (tok, void, loc);
};

Aside from the EOF case, and simple single-character operators like “;”, both of which this function handles itself, its role is to dispatch work to various sub-lexers.

Expand me to read the helper functions
fn nextw(lex: *lexer) ((rune, location) | io::EOF | io::error) = {
	for (true) {
		let loc = mkloc(lex);
		match (next(lex)) {
			e: (io::error | io::EOF) => return e,
			r: rune => if (!ascii::isspace(r)) {
				return (r, loc);
			} else {
				free(lex.comment);
				lex.comment = "";
			},
		};
	};
	abort();
};
fn unget(lex: *lexer, r: (rune | io::EOF)) void = {
	if (!(lex.rb[0] is void)) {
		assert(lex.rb[1] is void, "ungot too many runes");
		lex.rb[1] = lex.rb[0];
	};
	lex.rb[0] = r;
};
fn is_name(r: rune, num: bool) bool =
	ascii::isalpha(r) || r == '_' || r == '@' || (num && ascii::isdigit(r));

The sub-lexers handle more specific cases. The lex_name function handles things which look like identifiers, including keywords; the lex_literal function handles things which look like literals (e.g. “1234”); lex_rn_str handles rune and string literals (e.g. “hello world” and ‘\n’); and lex2 and lex3 respectively handle two- and three-character operators like “&&” and “>>=”.

lex_name is the most complicated of these. Because the only thing which distinguishes a keyword from an identifier is that the former matches a specific list of strings, we start by reading a “name” into a buffer, then binary searching against a list of known keywords to see if it matches something there. To facilitate this, “bmap” is a pre-sorted array of keyword names.

const bmap: [_]str = [
	// Keep me alpha-sorted and consistent with the ltok enum.
	"_",
	"abort",
	"alloc",
	"append",
	"as",
	"assert",
	"bool",
	// ...
];

fn lex_name(lex: *lexer, loc: location, keyword: bool) (token | error) = {
	let buf = strio::dynamic();
	match (next(lex)) {
		r: rune => {
			assert(is_name(r, false));
			strio::appendrune(buf, r);
		},
		_: (io::EOF | io::error) => abort(), // Invariant
	};

	for (true) match (next(lex)?) {
		_: io::EOF => break,
		r: rune => {
			if (!is_name(r, true)) {
				unget(lex, r);
				break;
			};
			strio::appendrune(buf, r);
		},
	};

	let name = strio::finish(buf);
	if (!keyword) {
		return (ltok::NAME, name, loc);
	};

	return match (sort::search(bmap[..ltok::LAST_KEYWORD+1],
			size(str), &name, &namecmp)) {
		null => (ltok::NAME, name, loc),
		v: *void => {
			defer free(name);
			let tok = v: uintptr - &bmap[0]: uintptr;
			tok /= size(str): uintptr;
			(tok: ltok, void, loc);
		},
	};
};

The rest of the code is more of the same, but I’ve put it up here if you want to read it.

Let’s move on to parsing: we need to turn this one dimensional stream of tokens into an structured form: the Abstract Syntax Tree. Consider the following sample code:

let x: int = add2(40, 2);

Our token stream looks like this:

let x : int = add2 ( 40 , 2 ) ;

But what we need is something more structured, like this:

binding
	name="x"
	type="int"
	initializer=call-expression
	=>	func="add2"
		parameters
			constant value="40"
			constant value="2"

We know at each step what kinds of tokens are valid in each situation. After we see “let”, we know that we’re parsing a binding, so we look for a name (“x”) and a colon token, a type for the variable, an equals sign, and an expression which initializes it. To parse the initializer, we see an identifier, “add2”, then an open parenthesis, so we know we’re in a call expression, and we can start parsing arguments.

To make our parser code expressive, and to handle errors neatly, we’re going to implement a few helper function that lets us describe these states in terms of what the parser wants from the lexer. We have a few functions to accomplish this:

// Requires the next token to have a matching ltok. Returns that token, or an error.
fn want(lexer: *lex::lexer, want: lex::ltok...) (lex::token | error) = {
	let tok = lex::lex(lexer)?;
	if (len(want) == 0) {
		return tok;
	};
	for (let i = 0z; i < len(want); i += 1) {
		if (tok.0 == want[i]) {
			return tok;
		};
	};

	let buf = strio::dynamic();
	defer io::close(buf);
	for (let i = 0z; i < len(want); i += 1) {
		fmt::fprintf(buf, "'{}'", lex::tokstr((want[i], void, mkloc(lexer))));
		if (i + 1 < len(want)) {
			fmt::fprint(buf, ", ");
		};
	};
	return syntaxerr(mkloc(lexer), "Unexpected '{}', was expecting {}",
		lex::tokstr(tok), strio::string(buf));
};

// Looks for a matching ltok from the lexer, and if not present, unlexes the
// token and returns void. If found, the token is consumed from the lexer and is
// returned.
fn try(
	lexer: *lex::lexer,
	want: lex::ltok...
) (lex::token | error | void) = {
	let tok = lex::lex(lexer)?;
	assert(len(want) > 0);
	for (let i = 0z; i < len(want); i += 1) {
		if (tok.0 == want[i]) {
			return tok;
		};
	};
	lex::unlex(lexer, tok);
};

// Looks for a matching ltok from the lexer, unlexes the token, and returns
// it; or void if it was not a ltok.
fn peek(
	lexer: *lex::lexer,
	want: lex::ltok...
) (lex::token | error | void) = {
	let tok = lex::lex(lexer)?;
	lex::unlex(lexer, tok);
	if (len(want) == 0) {
		return tok;
	};
	for (let i = 0z; i < len(want); i += 1) {
		if (tok.0 == want[i]) {
			return tok;
		};
	};
};

Let’s say we’re looking for a binding like our sample code to show up next. The grammar from the spec is as follows:

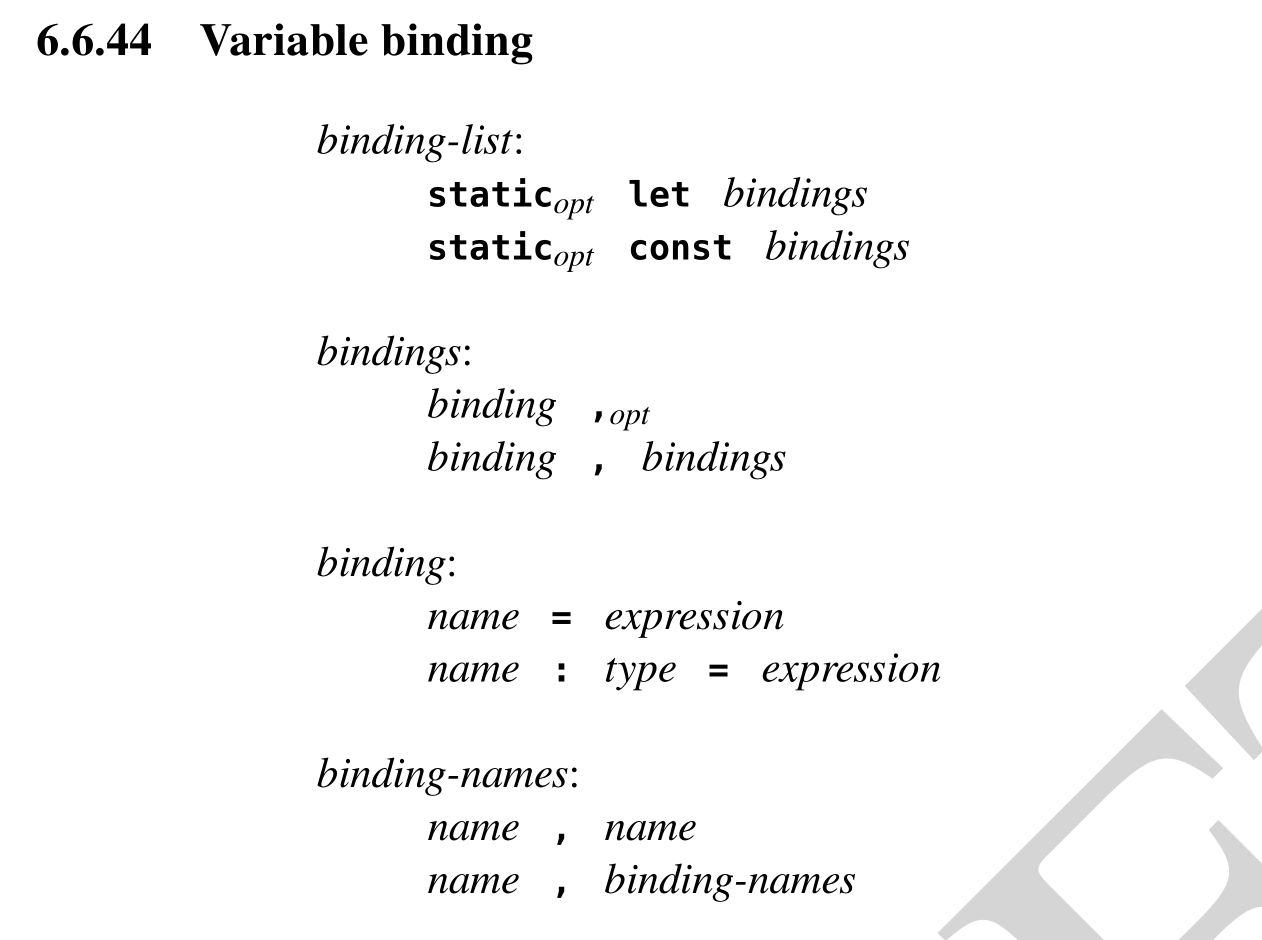
And here’s the code that parses that:

fn binding(lexer: *lex::lexer) (ast::expr | error) = {
	const is_static: bool = try(lexer, ltok::STATIC)? is lex::token;
	const is_const = switch (want(lexer, ltok::LET, ltok::CONST)?.0) {
		ltok::LET => false,
		ltok::CONST => true,
	};

	let bindings: []ast::binding = [];
	for (true) {
		const name = want(lexer, ltok::NAME)?.1 as str;
		const btype: nullable *ast::_type =
			if (try(lexer, ltok::COLON)? is lex::token) {
				alloc(_type(lexer)?);
			} else null;
		want(lexer, ltok::EQUAL)?;
		const init = alloc(expression(lexer)?);
		append(bindings, ast::binding {
			name = name,
			_type = btype,
			init = init,
		});
		match (try(lexer, ltok::COMMA)?) {
			_: void => break,
			_: lex::token => void,
		};
	};

	return ast::binding_expr {
		is_static = is_static,
		is_const = is_const,
		bindings = bindings,
	};
};

Hopefully the flow of this code is fairly apparent. The goal is to fill in the following AST structure:

// A single variable biding. For example:
//
// 	foo: int = bar
export type binding = struct {
	name: str,
	_type: nullable *_type,
	init: *expr,
};

// A variable binding expression. For example:
//
// 	let foo: int = bar, ...
export type binding_expr = struct {
	is_static: bool,
	is_const: bool,
	bindings: []binding,
};

The rest of the code is pretty similar, though some corners of the grammar are a bit hairier than others. One example is how we parse infix operators for binary arithmetic expressions (such as “2 + 2”):

fn binarithm(
	lexer: *lex::lexer,
	lvalue: (ast::expr | void),
	i: int,
) (ast::expr | error) = {
	// Precedence climbing parser
	// https://en.wikipedia.org/wiki/Operator-precedence_parser
	let lvalue = match (lvalue) {
		_: void => cast(lexer, void)?,
		expr: ast::expr => expr,
	};

	let tok = lex::lex(lexer)?;
	for (let j = precedence(tok); j >= i; j = precedence(tok)) {
		const op = binop_for_tok(tok);

		let rvalue = cast(lexer, void)?;
		tok = lex::lex(lexer)?;

		for (let k = precedence(tok); k > j; k = precedence(tok)) {
			lex::unlex(lexer, tok);
			rvalue = binarithm(lexer, rvalue, k)?;
			tok = lex::lex(lexer)?;
		};

		let expr = ast::binarithm_expr {
			op = op,
			lvalue = alloc(lvalue),
			rvalue = alloc(rvalue),
		};
		lvalue = expr;
	};

	lex::unlex(lexer, tok);
	return lvalue;
};

fn precedence(tok: lex::token) int = switch (tok.0) {
	ltok::LOR => 0,
	ltok::LXOR => 1,
	ltok::LAND => 2,
	ltok::LEQUAL, ltok::NEQUAL => 3,
	ltok::LESS, ltok::LESSEQ, ltok::GREATER, ltok::GREATEREQ => 4,
	ltok::BOR => 5,
	ltok::BXOR => 6,
	ltok::BAND => 7,
	ltok::LSHIFT, ltok::RSHIFT => 8,
	ltok::PLUS, ltok::MINUS => 9,
	ltok::TIMES, ltok::DIV, ltok::MODULO => 10,
	* => -1,
};

I don’t really grok this algorithm, to be honest, but hey, it works. Whenever I write a precedence climbing parser, I’ll stare at the Wikipedia page for 15 minutes, quickly write a parser, and then immediately forget how it works. Maybe I’ll write a blog post about it someday.

Anyway, ultimately, this code lives in our standard library and is used for several things, including our (early in development) self-hosted compiler. Here’s an example of its usage, taken from our documentation generator:

fn scan(path: str) (ast::subunit | error) = {
	const input = match (os::open(path)) {
		s: *io::stream => s,
		err: fs::error => fmt::fatal("Error reading {}: {}",
			path, fs::strerror(err)),
	};
	defer io::close(input);
	const lexer = lex::init(input, path, lex::flags::COMMENTS);
	return parse::subunit(&lexer)?;
};

Where the “ast::subunit” type is:

// A sub-unit, typically representing a single source file.
export type subunit = struct {
	imports: []import,
	decls: []decl,
};

Pretty straightforward! Having this as part of the standard library should make it much easier for users to build language-aware tooling with the language itself. We also plan on having our type checker in the stdlib as well. This is something that I drew inspiration for from Golang — having a lot of their toolchain components in the standard library makes it really easy to write Go-aware tools.

So, there you have it: the next stage in the development of our language. I hope you’re looking forward to it!

Read the whole story
sbanwart
1089 days ago
reply
Akron, OH
Share this story
Delete

Python in Visual Studio Code – April 2021 Release

2 Shares

We are pleased to announce that the April 2021 release of the Python Extension for Visual Studio Code is now available. You can download the Python extension from the Marketplace, or install it directly from the extension gallery in Visual Studio Code. If you already have the Python extension installed, you can also get the latest update by restarting Visual Studio Code. You can learn more about Python support in Visual Studio Code in the documentation.

This release includes a preview of support for Poetry environments, improved completions for PyTorch 1.8.1 when using Pylance, as well enhancements to the Data Viewer. You can check the full list of fixes and improvements in our changelog.

Support for Poetry environments

We’re excited to announce our preview support for Poetry environments in Visual Studio Code, the most requested feature in our GitHub repository!

Poetry is a Python package and dependency manager that makes it easy to build, publish your projects, as well as and check the state of its dependencies.

If you’re using our Insiders build, you will be able select interpreters from environments created using Poetry, as they’re now automatically discovered by the Python extension. Once you select it, you can create a new terminal to have that environment automatically activated.

Selecting a Poetry environment in VS Code.

The Python extension will also use Poetry when installing packages on your behalf:

Installing black with poetry in VS Code.

If you want to try this out, you can join our Insiders program by opening the command palette (View > Command Palette…) and run the “Python: Switch to Insiders Weekly Channel”. Once the insiders build finishes downloading, you will be prompted to reload the window.

If you’re using Poetry for the first time, make sure you follow the setup instructions from Poetry’s documentation.

We look forward to bringing this experience to the stable version of the Python extension, so if you try this out and see any issues with it, please file a bug report.

Improved auto-completions for PyTorch 1.8.1 with Pylance

We’re excited to announce that our team spent some time in the last month contributing to the PyTorch project to update how submodules are exported in the top-level torch module. With these changes, Pylance users using PyTorch should update to PyTorch 1.8.1 to get dramatically improved completions for submodules (e.g. nn, optim, cuda).

Enhanced auto completions for pytorch with pylance.

Data Viewer Enhancements

Upgraded Data Viewer

In case you missed it in the latest release of the Jupyter extension, we’ve made many improvements to our Data Viewer.

Firstly, we have added the ability to refresh the Data Viewer. If you’ve made some changes or transformations to your data, rather than having to close and reopen the Data Viewer to view the changes, you can now click the refresh button in the top corner of the Data Viewer to grab the most up-to-date data.

Secondly, the Data Viewer now supports viewing both PyTorch and TensorFlow Tensor data types!

Thirdly, we’ve given the entire Data Viewer a visual update to make it more aesthetically pleasing. You can now find the filter box at the heading of each column, and you can click into individual cells in the Data Viewer to copy out their contents. You can continue to click on any column heading to sort its data ascending/descending.

Last but not least, the Data Viewer now supports slicing data, which allows you to view any 2D slice of your higher dimensional data. If you have 3-dimensional or greater data (numpy ndarray, PyTorch Tensor or TensorFlow EagerTensor types), you will now be able to view that multi-dimensional data in the Data Viewer and a new data slicing panel will open in the Data Viewer by default. In this panel, you will be able to either use an input box to programmatically specify your slice using Python slice syntax or use the interactive Axis and Index dropdowns to slice as well. Both will be in sync.

Data Slicing

Other Changes and Enhancements

We have also added small enhancements and fixed issues requested by users that should improve your experience working with Python in Visual Studio Code. Some notable changes include:

  • Deprecate format on type since it isn’t used in newer Language servers. (#15709)
  • Remove notification prompt to install pylint by default (#15465)
  • Prevent mypy errors for other files showing in current file. (thanks Steve Dignam) (#10190)
  • Ensure jedi processes are terminated on language server dispose. (#15644)
  • Add a refresh icon next to interpreter list (available in the Insiders build). (#15868)

Be sure to download the Python extension for Visual Studio Code now to try out the above improvements. If you run into any problems or have suggestions, please file an issue on the Python VS Code GitHub page.

The post Python in Visual Studio Code – April 2021 Release appeared first on Python.

Read the whole story
sbanwart
1091 days ago
reply
Akron, OH
Share this story
Delete

Servicing the Windows Subsystem for Linux (WSL) 2 Linux kernel

2 Shares

Note: This blog post is co-authored by the awesome WSL dev Pierre Boulay. Thanks Pierre! 😊

We’ve just shipped the 5.10.16.3 WSL 2 Linux kernel version to Windows Insiders which brings exciting new changes: Support for the LUKS disk encryption, and some long-awaited bug fixes. We’d like to seize this opportunity to highlight these improvements and show you how these changes land on your Windows machine no matter your Windows version.

New feature addition: Support for LUKS disk encryption

This kernel update adds support for LUKS disk format. Such disks can now we accessed using wsl –mount.

LUKS disks can be mounted through the following steps: (Refer to distro specific instructions to install cryptsetup if needed).

$ wsl --mount [disk-id] --bare
$ wsl cryptsetup luksOpen /dev/sdX my-device # Replace /dev/sdX with the block device path in WSL.
$ wsl mkdir /mnt/wsl/my-mountpoint
$ wsl mount /dev/mapper/my-device /mnt/wsl/my-mountpoint

The disk content can then be accessed by navigating to \\wsl$\<yourDistroName>\mnt\wsl (Replace with the name of your distro, any disto works). Please check the wsl –mount docs page for full instructions on how to mount a disk in WSL.

Bug fix: Clock sync

This new kernel version also contains a bug fix for a clock sync issue (Github Issue #5324). This issue causes the clock inside of your WSL 2 instances to be different than the actual time on your host machine. This bug was fixed entirely by changes inside of the Linux kernel itself that are present in this latest version.

Our kernel servicing process

These changes are very easy to get onto your machine, in fact it’s likely you won’t even notice that you are put onto the latest kernel version! We leverage Microsoft Update to ship this to you, and by hitting ‘Check for Updates’ in your settings, or just letting your computer update like normal, you’ll be kept up to date.

Windows Settings check for updates

Microsoft Update delivers general updates to your operating system that don’t rely on giving a full update to your Windows build. These updates include things such as the latest virus definitions for Windows Defender, new graphics or sound card drivers, and now updates to your WSL 2 Linux kernel.

At Microsoft, the Linux Systems Group is responsible for creating the WSL 2 Linux kernel. You can read about this process at the ‘Shipping a Linux Kernel with Windows’ blog post. Once they have a kernel version ready, we test it internally to make sure it works on WSL 2 scenarios, and then ship it to Windows Insiders. The Windows Insiders audience is an invaluable group of people who use early preview versions of Windows, and so we recruit their help as well to get the first preview of new WSL 2 Linux kernels. Our release process is data driven, and once we’ve gained enough confidence on the quality of the new kernel, we expand its audience to further Windows Insider rings and then eventually to retail.

We publish our kernel version history to the Linux kernel release notes page on the WSL docs, and since the WSL 2 Linux kernel is fully open source we make sure to link to its source code as well.

Where to learn more and give feedback

For any WSL issues please file them at the WSL Github repo. If you’d like to learn more about WSL please check out the WSL docs, and if you have general questions you can follow me on Twitter @craigaloewen and WSL team members at this list. Happy coding!

The post Servicing the Windows Subsystem for Linux (WSL) 2 Linux kernel appeared first on Windows Command Line.

Read the whole story
sbanwart
1095 days ago
reply
Akron, OH
Share this story
Delete

Announcing HashiCorp Boundary 0.2

1 Share

We are pleased to announce the release of HashiCorp Boundary 0.2 and Boundary Desktop 1.0. Boundary provides identity-based access management for dynamic infrastructure. Boundary 0.2 focuses on meeting users’ production adoption needs.

This release includes several key features and improvements:

  • OIDC authentication methods: Authenticate to Boundary with your external identity provider (IDP) of choice, including Azure Active Directory, Okta, and many others that support Open ID Connect.
  • Boundary Desktop general availability on MacOS: Boundary Desktop gives users the ability to connect to remote targets and view active session details, all from a convenient macOS desktop application. Windows support will be added in a future update.

Given that Boundary 0.2 will be the first time many users evaluate Boundary since its 0.1 launch, it’s worth calling out some of the new capabilities that have been delivered since 0.1:

  • Worker tags and filters: Enable target traffic to be effectively “tied” to a given set of workers with worker tags, forcing the session to occur through specified workers for a specific target.
  • Boundary upgrades and database migrations: Boundary provides an easy upgrade path with fail-safes in the event of migration issues.
  • Resource filtering and listing improvements: Boundary users can navigate their resources more easily by filtering list actions based on resource information.
  • Improvements for Kubernetes access,boundary connect kube: Run Boundary on Kubernetes and/or use Boundary to manage access to your Kubernetes APIs and kube services.
  • Boundary reference architectures: Learn how to deploy Boundary with reference architectures for popular platforms, including Kubernetes, Amazon Web Services (AWS), Microsoft Azure, Google Cloud, and Docker.

Boundary 0.2 also includes many additional minor features, improvements, and bug fixes. The Boundary changelog provides a full list of all changes.

»OIDC Authentication Method

One of the community’s biggest asks since Boundary’s launch is the ability for users to leverage external identity providers (IDPs) to log into Boundary. Boundary 0.2 adds support for OIDC authentication methods, which allow users to delegate authentication to an OIDC provider. This feature enables Boundary to integrate with popular identity providers like Microsoft Azure Active Directory, Okta, cloud identity management systems such as AWS IAM, and others.

Boundary

In this release, users can create, read, update, and delete a new OIDC authentication method resource and then use it to login via the CLI, Boundary Desktop, or the Boundary Admin Console. OIDC auth method configuration is initially available via the command line, and in upcoming releases we’ll also be integrating OIDC configuration into Boundary’s Terraform Provider as well as the Boundary administration console..

To get started with creating OIDC auth methods to log into Boundary with common OIDC providers, check out the new Boundary OIDC learn tutorial.

»Desktop Client GA

We would like to say a big thank you to everyone who tried out our beta release of Boundary Desktop for MacOS. We are excited to announce that Boundary Desktop is now generally available. In this initial GA release, we’re introducing some new features and bug fixes, including login via OIDC authentication and AutoUpdate for MacOS.

  • OIDC login: Users can now login to Boundary Desktop with an OIDC identity provider.
Boundary
  • AutoUpdate for MacOS: AutoUpdate the Boundary Desktop app as new versions become available.
Boundary

Get started with Boundary Desktop here

»Upgrade Details

Boundary 0.2 introduces significant new functionality. Please review Boundary’s general upgrade guide and Release Notes for details.

As always, we recommend upgrading and testing this release in an isolated environment. If you experience any issues, please report them on the Boundary GitHub issue tracker or post to the Boundary discussion forum. As a reminder, if you believe you have found a security issue in Boundary, please responsibly disclose it by emailing security@hashicorp.com — do not use the public issue tracker. Our security policy and our PGP key can be found on the HashiCorp security page.

We hope you enjoy Boundary 0.2!

Read the whole story
sbanwart
1096 days ago
reply
Akron, OH
Share this story
Delete

Work with GitHub Actions in your terminal with GitHub CLI

1 Share

gh brings GitHub to the command line by helping developers manage pull requests, issues, gists, and much more. As of 1.9.0, even more of GitHub is available in your terminal: GitHub Actions.

It’s already possible to make great things using gh from within GitHub Actions as Mislav shared in his recent blog post. Now, you can get insight into workflow runs and files from the comfort of your own local terminal with two new top-level commands: gh run and gh workflow.

Getting insight into workflow runs

Despite our best efforts to write code that is good and true, builds sometimes fail. It’s possible to get quick insight into what might be failing for an open pull request with gh pr checks, but this doesn’t help with understanding workflow runs across an entire repository. With the new gh run list, you receive an overview of all types of workflow runs whether they were triggered via a push, pull request, webhook, or manual event.

We’ve made it easier to stay on top of in-progress workflow runs with gh run watch, which you can use to either follow along as a workflow run executes or combine with other tools to alert you when runs are finished. Combining gh run watch with, on Ubuntu, a command like notify-send means more time to wander off from your keyboard and do something like pet a cat or gaze at a plant.

…and when the run is done:

To drill down into the details of a single run, you can use gh run view, optionally going into as much detail as the individual steps of a job. For example, you might want to know why the linter failed on some code:

For more mysterious failures, you can combine a tool like grep with gh run view --log to search across a run’s entire log output. This can help you debug failures across a build matrix. For example, I can see here that panic is happening on Ubuntu and MacOS but not on Windows:

If --log is too much information, gh run --log-failed will output only the log lines for individual steps that failed. This is great for getting right to the logs for a failed step instead of having to run grep yourself. To illustrate, here I’m using --log-failed to only see the log output for a step that failed instead of the log output for every step:

gh run also knows about artifacts generated during a workflow run and can help discover and retrieve them.

To download artifacts, you can select them by name with gh run download -n tps-report or via an interactive selector:

Finally, if you suspect that a run might be failing intermittently or just really like to watch things fail, you can now rerun runs without leaving your terminal using gh run rerun:

It’s easier to manage workflow files too

Runs in GitHub Actions are defined by workflow files in YAML format living in .github/workflows in your repository. A workflow file describes a workflow’s name, behavior, and what types of events cause the workflow to be run.

With gh workflow view, you can get a summary of a workflow’s recent runs to help ensure it’s doing what you want. To remind yourself what a workflow does, gh workflow view --yaml will print it out, complete with pretty colors.

Sometimes workflows are broken or are works in progress. To conveniently manage them without having to remove them entirely from your repository, you can now use gh workflow enable and gh workflow disable:

While many workflow runs are triggered by pull requests or pushed branches, it’s possible to have a workflow file run on command using a workflow_dispatch event.

You might want to run a workflow on command to perform cleanup tasks in a repository or perhaps set a workflow for manual dispatch while it’s still a work in progress. Workflows that support this event can now be triggered from your command line with gh workflow run, making it more convenient to work with and script workflow_dispatch workflows.

To see how gh workflow run can help with workflow file development, I’ll show an example of how it can fit into your toolchain. I want to run some automation on incoming pull requests to ensure they meet certain criteria. Here’s a workflow file called pr-check.yml that checks if incoming pull requests have a body:

name: Pull Request Check

on:
  workflow_dispatch:
    inputs:
      body:
        default: ""
      test:
        default: "false"
  pull_request_target:

jobs:
  check-body-length:
    runs-on: ubuntu-latest
    steps:
      - name: check
        env:
          PRNUM: ${{ github.event.pull_request.number }}
          PRBODY: ${{ github.event.pull_request.body }}
          TESTBODY: ${{ github.event.inputs.body }}
          TEST: ${{ github.event.inputs.test }}
        run: |
          if [ "$TEST" = "true" ]
          then
            PRBODY=$TESTBODY
          fi

          commentPR () {
            if [ "$TEST" = "true" ]
            then
              echo "would comment: '${1}'"
            else
              gh pr comment $PRNUM -b "${1}"
            fi
          }

          if [ "$PRBODY" = "" ]
          then
            commentPR "Thanks! Please add a body so we can better review your contribution."
          fi

(See this file as a gist)

It responds to both pull_request_target and workflow_dispatch, meaning it will run whenever a pull request opens on my repository or when I manually invoke it.

When invoked manually, it accepts a test input that allows for a mock pull request body to be checked. I can run it like this:

I can check the output of gh run view --log to ensure that the code behaved as expected. Since I’m on the command line, this process can be further scripted or streamlined with aliases.

Being able to programmatically run this workflow right from my terminal as I work makes me feel better about modifying the if [ $PRBODY = true ] conditional to do more complex things.

Let us know what you think

Let us know what you come up with using gh run and gh workflow in our Discussion forum! We’re excited to iterate on this new integration, and are eager for feedback. Are you new to the GitHub CLI? Install it today.

In the future, we hope to make it even easier to author and deploy workflow files, but for now we hope you enjoy everything that’s new in GitHub 1.9.0.

Read the whole story
sbanwart
1096 days ago
reply
Akron, OH
Share this story
Delete

Why you shouldn't use ENV variables for secret data

1 Share

Why you shouldn't use ENV variables for secret data

I do this all the time, but this article provides a good set of reasons that secrets in environment variables are a bad pattern - even when you know there's no multi-user access to the host you are deploying to. The biggest problem is that they often get captured by error handling scripts, which may not have the right code in place to redact them. This article suggests using Docker secrets instead, but I'd love to see a comprehensive write-up of other recommended patterns for this that go beyond applications running in Docker.

Via The environ-config tutorial

Read the whole story
sbanwart
1097 days ago
reply
Akron, OH
Share this story
Delete
Next Page of Stories